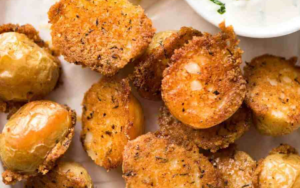
These Crispy Roasted Parmesan Crusted Potatoes are epic! Make them for your Sunday Roast or pass them around at a gathering.
Origin
Where did the baking potato originate from? It is believed that baked potatoes originate from South America, or more specifically, Peru. The Inca Indians in Peru were said to be the first to originally cultivate potatoes and when the Spanish conquistadors conquered Peru, they brought the potato to Europe.
These Crispy Roasted Parmesan Potatoes are epic! Make them for your Sunday Roast or pass them around at a gathering. It goes without saying that these are all about that crispy, golden parmesan crust…..
Drizzle oil in 9 x 13" glass baking dish. Tilt pan to spread all over the base
Use a spoon to scatter the Parmesan Mixture over the base. Spread as evenly as you can. Once sprinkled, do not touch – don't try to spread it.
Place potatoes cut side down, pressing firmly.
Optional: drizzle top of potatoes with a touch of oil or spray with oil, then sprinkle with salt.
Bake potatoes for 35 – 40 minutes or until they are soft and the parmesan crust is deep golden (you can check through the glass!)
REST for 5 minutes. Then use an spatula to cut between every 4 or so potatoes, then scoop up 4 or so potatoes and flip them upside down so the cheese side is up on a serving platter.
Serve with Dipping Sauce, if using, and sprinkle over extra green onions if desired. Serve as a side dish or as nibbles!
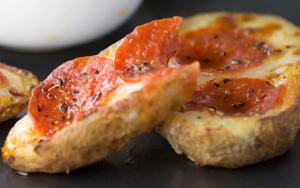
Potato skins, also sometimes referred to as potato jackets, are a snack food or appetizer made of unpeeled potato halves, hollowed and dressed with bacon, cheddar cheese and green onions before being baked again. They are commonly found on the menus of casual dining restaurants in the United States. While popularly eaten in restaurants and pubs, these snacks are also commonly made at home.
Preheat your broiler to high. When your baked potato are cool enough to handle, make two cuts down the potato lengthwise so that you are left with three pieces. Discard the middle slice of the potato (or save for other use) so that you are left with just the ends of each potato. Use a spoon to slightly scrape some of the pulp out of each potato skin so that you have only about 1/4 inch of potato left.
In the microwave, melt 2 tablespoons of butter (30-40 seconds does the trick). Brush both sides of the potato skin with the melted butter. Lightly salt and pepper the potato skin and place in the broiler for 8 minutes, flipping the potatoes once after four minutes so that each side of the potato is able to crisp up.
Take the potato skins out of the broiler and top with shredded mozzarella cheese and two pepperoni slices per potato skin.
Sprinkle each potato skin with Italian seasoning.
Place the potato skins back in the broiler for another 2-4 minutes, or until the cheese has melted.
Serve with pizza sauce or marinara sauce on the side.
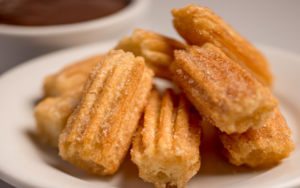
A churro is a type of fried dough from Spanish and Portuguese cuisine, made with choux pastry dough piped into hot oil with a piping bag and large closed star tip or similar shape. They are also found in Latin American cuisine, Philippine cuisine, and in other areas that have received immigration from Spanish and Portuguese-speaking countries, especially in the Southwestern United States and France.
Combine water, butter, salt, and ¼ teaspoon cinnamon in 1 ½-quart saucepan over medium heat. Bring pot to rolling boil.
Reduce heat to low
Add flour and stir vigorously until mix forms a ball.Remove from heat and let rest for 5-7 min
Add eggs, one at a time, and stir until combined. Set aside.
Heat oil in medium skillet or 1-quart saucepan over medium-high heat or until temperature reaches 350˚.
Spoon dough into piping bag fitted with large star tip. Pipe 1-inch strip of dough over saucepan,cut with knife, and drop into hot oil. Repeat until churro bites fill saucepan with room to fry.
Fry churro bites until golden brown. Remove with slotted spoon or mesh spider strainer.
Drain churro bites on paper towel.
Mix sugar and ½ teaspoon cinnamon in medium bowl. Toss in churro bites until coated. Place on serving plate and serve with favorite dipping sauce.
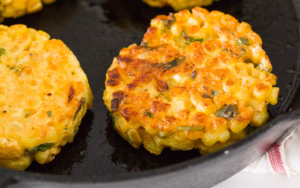
Cheesy Corn Fritters – Crispy on the edges, soft in the middle and so delicious, these little cheesy cakes are so easy to put together and make a great side dish for any dinner!
Native Americans had been using ground corn (maize) as food for thousands of years before European explorers arrived in the New World. Corn-based products, such as corn flatbread, arepa and cornbread were staple foods in Pre-Columbian Americas. Native Americans did not use deep frying techniques, however, which require ample supplies of cooking oil as well as equipment in which the oil can be heated to high temperatures.
European settlers learned recipes and processes for corn dishes from Native Americans, and soon devised their own cornmeal-based recipe variations of European breads made from grains available on that continent. The corn fritter probably was invented in the Southern United States, whose traditional cuisine contains a lot of deep fried foods.
Crispy on the edges, soft in the middle and so delicious, these little cheesy cakes are so easy to put together and make a great side dish for any dinner!
Mix the corn, cornmeal, flour, paprika, egg, parmesan, green onion, cilantro, lime juice in a large bowl. Add some water if the mixture is too dry.
Heat 1 tablespoon in a pan. Spoon the corn mixture into the pan to form patties and cook until golden brown on both sides, about 4 minutes per side. Garnish with a dollop of cream. Enjoy!
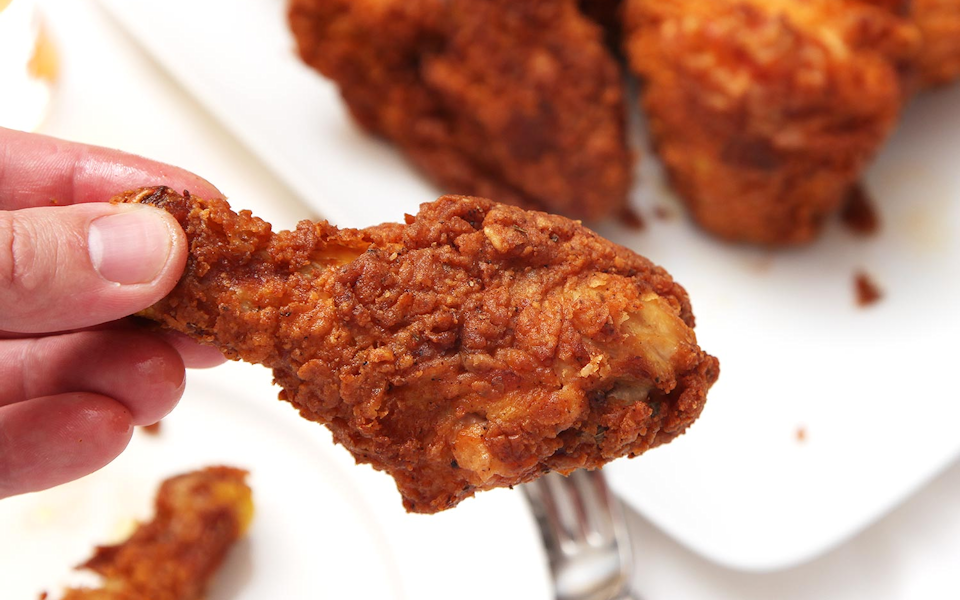
The American English expression “fried chicken” was first recorded in the 1830s, and frequently appears in American cookbooks of the 1860s and 1870s. The origin of fried chicken in the southern states of America has been traced to precedents in Scottish and West African cuisine. Scottish fried chicken was cooked in fat, and West African fried chicken added different seasonings, and was battered and cooked in palm oil. Scottish frying techniques and African seasoning techniques were used in the American South by enslaved Africans.
Whisk together the flour, cornstarch, baking powder, 2 teaspoons salt, and the remaining spice mixture in a large bowl. Add 3 tablespoons of the marinade from the zipper-lock bag and work it into the flour with your fingertips. Remove one piece of chicken from the bag, allowing excess buttermilk to drip off, drop the chicken into the flour mixture, and toss to coat. Continue adding chicken pieces to the flour mixture one at a time until they are all in the bowl. Toss the chicken until every piece is thoroughly coated, pressing with your hands to get the flour to adhere in a thick layer.
Adjust an oven rack to the middle position and preheat the oven to 350°F. Heat the shortening or oil to 425°F in a 12-inch straight-sided cast-iron chicken fryer or a large wok over medium-high heat. Adjust the heat as necessary to maintain the temperature, being careful not to let the fat get any hotter.
One piece at a time, transfer the coated chicken to a fine-mesh strainer and shake to remove excess flour. Transfer to a wire rack set on a rimmed baking sheet. Once all the chicken pieces are coated, place skin side down in the pan. The temperature should drop to 300°F; adjust the heat to maintain the temperature at 300°F for the duration of the cooking. Fry the chicken until it’s a deep golden brown on the first side, about 6 minutes; do not move the chicken or start checking for doneness until it has fried for at least 3 minutes, or you may knock off the coating. Care- fully flip the chicken pieces with tongs and cook until the second side is golden brown, about 4 minutes longer.
Transfer the chicken to a clean wire rack set on a rimmed baking sheet and place in the oven. Cook until an instant-read thermometer inserted into the thickest part of the breast registers 150°F and the legs register 165°F, 5 to 10 minutes; remove the chicken pieces to a second rack or a paper-towel-lined plate as they reach their final temperature. Season with salt and serve—or, for extra-crunchy fried chicken, go to step 7.
Place the plate of cooked chicken in the refrigerator for at least 1 hour, and up to overnight. When ready to serve, reheat the oil to 400°F. Add the chicken pieces and cook, flipping them once halfway through cooking, until completely crisp, about 5 minutes. Transfer to a wire rack set on a rimmed baking sheet to drain, then serve immediately.
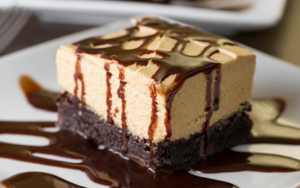
A chocolatey chewy brownie base gets topped with a fluffy peanut butter layer, then drizzled with chocolate syrup right before serving to create these Peanut Butter Brownies!
A chocolate brownie, or simply a brownie, is a chocolate baked confection. Brownies come in a variety of forms and may be either fudgy or cakey, depending on their density. Brownies often, but not always, have a glossy “skin” on their upper crust. They may also include nuts, frosting, chocolate chips, or other ingredients. A variation made with brown sugar and vanilla rather than chocolate in the batter is called a blond brownie or blondie. The brownie was developed in the United States at the end of the 19th century and popularized there during the first half of the 20th century.
A chocolatey chewy brownie base gets topped with a fluffy peanut butter layer, then drizzled with chocolate syrup right before serving to create this Peanut Butter Brownie Dream!
Line a square baking dish with foil hanging over the edges to create handles. This will make it easier to lift the dessert out of the pan when it is done. Spray the foil with cooking spray.
Prepare brownie mix according to package directions and spread into the prepared square pan. Bake according to package directions.
Allow the brownies to cool completely.
Peanut Butter Topping
With your mixer, whip an 8 ounce package of softened cream cheese until it is light and fluffy. Add in peanut butter and mix for a minute to combine. Slowly add in powdered sugar. At this point, the mixture will be very thick.
Add in Cool Whip and mix until the filling is light and fluffy.
Spread the filling over the brownie layer and place in the refrigerator for at least an hour.
Right before serving, cut the dessert into small pieces, drizzle with chocolate syrup, and serve.
Store leftovers covered tightly in the refrigerator.